About
I work with programming since 2002, I'm interested in general AI, Game Programming and Forex Market simulations.
Programming & Math Tutorials
90’s! The golden age of videogames?
Yes, nostalgia! Sega Genesis programming, why? Why to program in a very old platform aiming no profit. Why to spend time learning C or ASM in order to program for a videogame based on Motorola 68000.
Because we like programming and we like games! Nostalgia is included in the package.
When I begun to look for articles about Sega Genesis programming I discovered that I’d had to do ASM programming, so following genesis hardware specifications.
A good tutorial/article I found was this from Marc, for linux:
http://darkdust.net/writings/megadrive
I didn’t try implementing it in ASM because there is much verbose in ASM. I know programming in ASM makes the code more optimized but for the purpose of introducting in the genesis programming using a C Tool Kit could be a good way to start.
So I found this amazing development kit (Eclipse CDT), the SGDK http://stephane-d.github.io/SGDK/
Implementing a Hello World in SGDK
You saw there were some tutorials in SGDK above. I’m going to implement a Hello World from scratch based on the tutorials I said before. I’m going to explain step by step since eclipse installation.
Installing Eclipse CDT
STEP 1- I’m on Windows 7, 64 bits (x64), so all the packages compatibles with x64. The 32 bits (x86) packages of Java and Eclipse is compatible with 64 bits (x64) I’ll use 32 bits one.
I didn’t tested on Linux, I cannot guarantee this work on Linux.
STEP 2- You must have installed Java in your machine. At least the Java JRE (Java Runtime Environment) to run the Eclipse CDT. I did install JDK (Java Development Kit, that comes with JRE) because I also program in java so I downloaded the JDK from:
http://www.oracle.com/technetwork/java/javase/downloads/jdk7-downloads-1880260.html
I download the jdk-7u45-windows-i586.exe.
OBS: Java must be compatible with Eclipse CDT you’ll download, so download the same platform version, if you download 32 bits java you must download 32 bits eclipse.
STEP 3- Download Eclipse CDT from: http://www.eclipse.org/cdt/downloads.php
I downloaded the eclipse-cpp-kepler-SR1-win32 http://www.eclipse.org/downloads/download.php?file=/technology/epp/downloads/release/kepler/SR1/eclipse-cpp-kepler-SR1-win32.zip
OBS 1: Eclipse CDT platform version must be compatible with java one, if you download Eclipse CDT 32 bits, you must use java 32 bits, if you download Eclipse CDT 64 bits you must use Java 64 bits.
It’s possible to change this default or interchange the compatibility between 32 x 64 bits, but for the purpose of this hello world just use the same version.
OBS 2: This is link comes with Eclipse IDE + CDT. You can download the separate packages (cdt-master-8.2.1) to include CDT on a existing eclipse, but I wouldn’t recommend it if you don’t work with eclipse. So download the eclipse-cpp-kepler-SR1.
STEP 4- Install Java JRE or JDK. Just install normally following the installation steps. There’s no mystery for java installation.
STEP 5- Unpack the Eclipse CDT in a folder. I’ll put in the folder D:\eclipse_cdt, see the Figure 1:

Figure 1 – After unpacking the Eclipse CDT
STEP 6- Execute the eclipse.exe:
If you got this error:

Figure 2 – Error when opening incompatible version of windows
It means you are using a Eclipse CDT 64 bits with Java 32.
The Eclipse CDT and Java version must be the same. So go back to step 1 and 2 to download proper version of Java and Eclipse CDT.
If it opens ok, now choose a folder to the cdt workspace. I chose the D:\genesis (see figure 3)
For this hello world example Use a simple and less than 8 characteres folder like “genesis” without any special character or space. You never know when problems with old limitation of characters for windows folder will appear, specially when working with C and ASM.

Figure 3 – Choosing eclipse folder (choose simple less than 8 characters, without any special character or space)
Configuring the Eclipse CDT to run with SGDK
STEP 7- Download the SGDK lib here: https://code.google.com/p/sgdk/downloads/list
I downloaded the version sgdk094.7z
STEP 8– Unpack the sgdko94.7z in the folder D:\genesis\sdk
The folder must be like that:

Figure 4- Sdk files in the folder D:\genesis\sdk
And the structure of the files must be like that:
D:\genesis\helloworld
D:\genesis\sdk
Figure 5- Folders structure
STEP 9- Put D:\genesis\sdk folder in Windows Environment Path

Figure 6 – Set environment path
If you don’t know to set Environment variables look for: setting up environment variables windows
STEP 10- Create a new Project called: “Hello”

Figure 7 – Creating a new project (step 1)
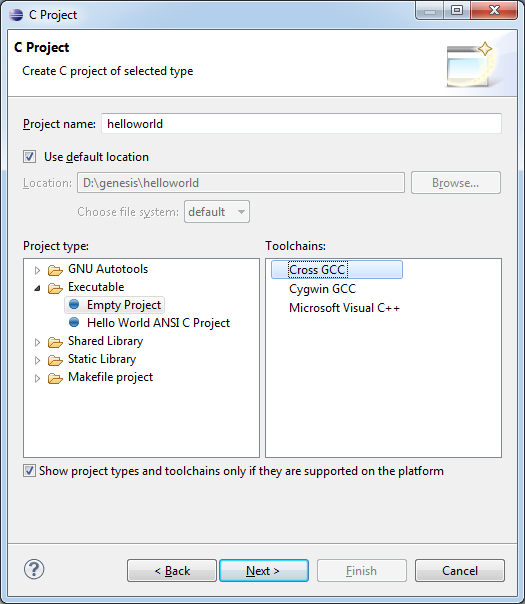
Figure 8 – Creating a new project (step 2)

Figure 9- Creating a new project (step 3)

Figure 10 – Creating a new project (step 4)
STEP 11- Setting up environment, in eclipse go to:
– Windows > Preferences
– Go to General > Worskpace, now uncheck build automatically and check save automatically

Figure 11 – Window > Preferences

Figure 12- Uncheck build automatically and check save automatically
STEP 12- Setting up build variables in C/C++ Build > Build Variables
– Variable name: GDK
– Type: Directory
– Value: D:\genesis\sdk

Figure 13- How to add a build variable

Figure 14 – The variables
STEP 13- Setting up build variables in C/C++ Build > Environment
Still in Preferences: “Windows > Preferences”
In C/C++ > Build > Environnement, add a new variable
– Name: GDK
– Value: D:\genesis\sdk

Figure 15 – Configuring Environment var
STEP 14- Setting up the project helloworld properties
Open the Project Preferences:

Figure 16 – Project properties
Now in C/C++ General > Paths and Symbols
Within the
> Includes tab
Set the include path
– Directory : ${GDK}/include
– Add to all configurations
– Add to all languages
After apply the configuration

Figure 17 – Project include options

Figure 18 – Applying the configuration
STEP 15- Setting up the project helloworld properties (build configuration)
Still within the project properties in the C/C++ Build:
– uncheck the: “Use default build command” option
– set the build directory to the root of your project, in this tutorial we’re using: ${workspace_loc:/helloworld}/

Figure 19 – Setup the build configuration
STEP 16- Set up the Market target
Create a new market target and set some options to it
– “Same as the target name unchecked”
– “Make target”: nothing
– Uncheck “Use builder settings”
Follow the Figures:

Figure 20 – Show the Market Target tab

Figure 21 – Create new market target

Figure 22 – Edit the created market target

Figure 23 – Put this configuration to market target
STEP 17- Creating the source file and building the project
Create a new main.c source file:

Figure 24 – How to create new main.c file

Figure 25 – Creating new main.c file
Double click the Market target created and build the project.

Figure 26 – Building the project

Figure 27- The project build success
STEP 18 (FINAL)- Put the generated rom.bin in an emulator, see how it appears:

Many steps, but it’s very detailed and following the steps you’ll build your first hello world project in Sega Genesis!
If you make some game for this system and you begin with this tutorial don’t forget sending me screenshots of the game ok?
If you find anything wrong with the tutorial, didn’t get to make it work or any suggestion please contact-me.
You can also put your doubt in the forum of the SGDK: http://gendev.spritesmind.net/forum/viewforum.php?f=19
Genesis does what Nindendon’t ???
I work with programming since 2002, I'm interested in general AI, Game Programming and Forex Market simulations.

When I tried to compile, it seemed to escape my path for some reason, or took out the slashes. Really strange stuff.
“C:\\Users\\Alex\\workspace\\gensdk\\bin\\make” -f “C:\\Users\\Alex\\workspace\\gensdk/makefile.gen”
C:\Users\Alex\workspace\gensdk/bin/mkdir -p src/boot
zsh: no such file or directory: C:UsersAlexworkspacegensdk\bin\mkdir
make: *** [src/boot/sega.s] Error 1
Didn’t you put any / instead of \?
E.g. See Step13: D:/genesis/sdk instead of D:\genesis\sdk
Another thing could be the “workspace path”, workspace has 9 characteres, some old folders with more than 8 characteres were not supported.
I don’t think this is the problem, but try to use C:\genesis\…
Are you using Cross GCC? I used the default eclipse configuration… it depends on the machine you setting up, try using another compile.
Hey, so I know I’m like 15 months late but it seems the .exe erases our \ when compiling. Any clues on how to fix this? Maybe I’ll just download your version instead of the latest one…
Felipe, thank you very much for this post. I will be trying this.
You’re welcome 😉
it doesn’t work
What step did not work?
Hi, I would like to work with creating Genesis games as well, and this seems to the most usefull thus far I could find, with-out doing the whole asm way, that’s fine and good to but it seems I’m having the exact same problem as Alex above, I tried your suggestion but it still does that. not sure why it isn’t putting a slash’s in between C:genesissk, any way to fix this?
huh, figured it out, you can add it into the tutorial for other’s to avoid this problem, by just having forward slashes on the Preferences Build variables, and the environment, as well with the project environment GDK and the PWD. seems to build just fine
Here is my probleme:
Description Resource Path Location Type
libres.h: No such file or directory mouh line 18, external location: C:\sgdk\inc\font.h C/C++ Problem