Когда я обдумывал возможные способы создания динамически перевода 2D-спрайтов в LibGDX, то мне порекомендовали один из способов - динамическое преобразование 3D-объекта в 2D-текстуру. Сначала я думал, что это будет сложно, но на самом деле это оказалось очень просто. Собственно, я освоил это решение, поэтому хотел бы поделиться сегодняшним уроком.
Берем 3D-сцену в LibGDX и рендерим в 2D-текстуру. Код является просто модификацией кода "Blender to GDX":
Код
package com.gamefromscratch; import com.badlogic.gdx.ApplicationListener; import com.badlogic.gdx.Files.FileType; import com.badlogic.gdx.Gdx; import com.badlogic.gdx.InputProcessor; import com.badlogic.gdx.graphics.GL10; import com.badlogic.gdx.graphics.PerspectiveCamera; import com.badlogic.gdx.graphics.Pixmap.Format; import com.badlogic.gdx.graphics.Texture; import com.badlogic.gdx.graphics.g2d.SpriteBatch; import com.badlogic.gdx.graphics.g2d.TextureRegion; import com.badlogic.gdx.graphics.g3d.Environment; import com.badlogic.gdx.graphics.g3d.Model; import com.badlogic.gdx.graphics.g3d.ModelBatch; import com.badlogic.gdx.graphics.g3d.ModelInstance; import com.badlogic.gdx.graphics.g3d.attributes.ColorAttribute; import com.badlogic.gdx.graphics.g3d.loader.G3dModelLoader; import com.badlogic.gdx.utils.UBJsonReader; import com.badlogic.gdx.graphics.g3d.utils.AnimationController; import com.badlogic.gdx.graphics.g3d.utils.AnimationController.AnimationDesc; import com.badlogic.gdx.graphics.g3d.utils.AnimationController.AnimationListener; import com.badlogic.gdx.graphics.glutils.FrameBuffer; public class ModelTest implements ApplicationListener, InputProcessor { private PerspectiveCamera camera; private ModelBatch modelBatch; private Model model; private ModelInstance modelInstance; private Environment environment; private AnimationController controller; private boolean screenShot = false; private FrameBuffer frameBuffer; private Texture texture = null; private TextureRegion textureRegion; private SpriteBatch spriteBatch; @Override public void create() { // Create camera sized to screens width/height with Field of View of 75 degrees camera = new PerspectiveCamera( 75, Gdx.graphics.getWidth(), Gdx.graphics.getHeight()); // Move the camera 5 units back along the z-axis and look at the origin camera.position.set(0f,0f,7f); camera.lookAt(0f,0f,0f); // Near and Far (plane) represent the minimum and maximum ranges of the camera in, um, units camera.near = 0.1f; camera.far = 300.0f; // A ModelBatch is like a SpriteBatch, just for models. Use it to batch up geometry for OpenGL modelBatch = new ModelBatch(); // Model loader needs a binary json reader to decode UBJsonReader jsonReader = new UBJsonReader(); // Create a model loader passing in our json reader G3dModelLoader modelLoader = new G3dModelLoader(jsonReader); // Now load the model by name // Note, the model (g3db file ) and textures need to be added to the assets folder of the Android proj model = modelLoader.loadModel(Gdx.files.getFileHandle("data/benddemo.g3db", FileType.Internal)); // Now create an instance. Instance holds the positioning data, etc of an instance of your model modelInstance = new ModelInstance(model); //move the model down a bit on the screen ( in a z-up world, down is -z ). modelInstance.transform.translate(0, 0, -2); // Finally we want some light, or we wont see our color. The environment gets passed in during // the rendering process. Create one, then create an Ambient ( non-positioned, non-directional ) light. environment = new Environment(); environment.set(new ColorAttribute(ColorAttribute.AmbientLight, 0.8f, 0.8f, 0.8f, 1.0f)); // You use an AnimationController to um, control animations. Each control is tied to the model instance controller = new AnimationController(modelInstance); // Pick the current animation by name controller.setAnimation("Bend",1, new AnimationListener(){ @Override public void onEnd(AnimationDesc animation) { // this will be called when the current animation is done. // queue up another animation called "balloon". // Passing a negative to loop count loops forever. 1f for speed is normal speed. controller.queue("Balloon",-1,1f,null,0f); } @Override public void onLoop(AnimationDesc animation) { // TODO Auto-generated method stub } }); frameBuffer = new FrameBuffer(Format.RGB888,Gdx.graphics.getWidth(),Gdx.graphics.getHeight(),false); Gdx.input.setInputProcessor(this); spriteBatch = new SpriteBatch(); } @Override public void dispose() { modelBatch.dispose(); model.dispose(); } @Override public void render() { // You've seen all this before, just be sure to clear the GL_DEPTH_BUFFER_BIT when working in 3D Gdx.gl.glViewport(0, 0, Gdx.graphics.getWidth(), Gdx.graphics.getHeight()); Gdx.gl.glClearColor(1, 1, 1, 1); Gdx.gl.glClear(GL10.GL_COLOR_BUFFER_BIT | GL10.GL_DEPTH_BUFFER_BIT); // When you change the camera details, you need to call update(); // Also note, you need to call update() at least once. camera.update(); // You need to call update on the animation controller so it will advance the animation. Pass in frame delta controller.update(Gdx.graphics.getDeltaTime()); // If the user requested a screenshot, we need to call begin on our framebuffer // This redirects output to the framebuffer instead of the screen. if(screenShot) frameBuffer.begin(); // Like spriteBatch, just with models! pass in the box Instance and the environment modelBatch.begin(camera); modelBatch.render(modelInstance, environment); modelBatch.end(); // Now tell OpenGL that we are done sending graphics to the framebuffer if(screenShot) { frameBuffer.end(); // get the graphics rendered to the framebuffer as a texture texture = frameBuffer.getColorBufferTexture(); // welcome to the wonderful world of different coordinate systems! // simply put, the framebuffer is upside down to normal textures, so we have to flip it // Use a TextureRegion to do so textureRegion = new TextureRegion(texture); // and.... FLIP! V (vertical) only textureRegion.flip(false, true); } // In the case that we have a texture object to actually draw, we do so // using the old familiar SpriteBatch to do so. if(texture != null) { spriteBatch.begin(); spriteBatch.draw(textureRegion,0,0); spriteBatch.end(); screenShot = false; } } @Override public void resize(int width, int height) { } @Override public void pause() { } @Override public void resume() { } @Override public boolean keyDown(int keycode) { // TODO Auto-generated method stub return false; } @Override public boolean keyUp(int keycode) { // TODO Auto-generated method stub return false; } @Override public boolean keyTyped(char character) { // If the user hits a key, take a screen shot. this.screenShot = true; return false; } @Override public boolean touchDown(int screenX, int screenY, int pointer, int button) { // TODO Auto-generated method stub return false; } @Override public boolean touchUp(int screenX, int screenY, int pointer, int button) { // TODO Auto-generated method stub return false; } @Override public boolean touchDragged(int screenX, int screenY, int pointer) { // TODO Auto-generated method stub return false; } @Override public boolean mouseMoved(int screenX, int screenY) { // TODO Auto-generated method stub return false; } @Override public boolean scrolled(int amount) { // TODO Auto-generated method stub return false; } }
Вот и всё.
Запустите код, и вы получите те же результаты:
Однако, если вы нажмете любую клавишу, текущий кадр будет сохранен в виде текстуры, которая вместо этого будет отображаться на экране. Нажмите клавишу еще раз, чтобы обновить до текущего кадра:
Конечно, цвет фона отличается, потому что мы не задали его неявно. Вышеупомянутый объект a представляет собой объект текстуры LibGDX, который теперь можно рассматривать как 2D-спрайт, используемый как карта текстуры.
Код очень простой. У нас есть переключаемая переменная screenShot, которая устанавливается, если пользователь нажимает клавишу. Фактический процесс рендеринга в текстуру выполняется с помощью волшебства FrameBuffersl. Думайте о фреймбуфере как о месте, где OpenGL может что-то рендерить – рисовать графику не на экране, а в буфере памяти. Затем мы получаем этот буфер памяти как текстуру, используя getColorBufferTexture(). Единственная сложность заключается в том, что буфер кадра отображается в перевернутом виде. Это легко исправить, поместив текстуру в TextureRegion и обратив координату Y. Наконец, мы отображаем нашу недавно сгенерированную текстуру, используя нашего старого друга SpriteBatch.
Хорошо, когда что-то, что вы ожидаете сложным, на деле оказывается чем-то сверхлегким.
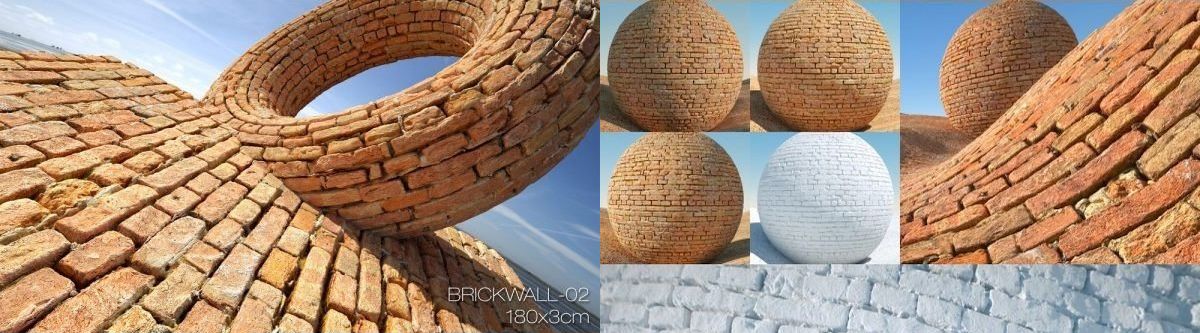
Если вы занимаетесь разработкой игр, рисованием в Photoshop или моделированием в 3D-редакторах, типа Blender 3, 3D Coat 2022, Modo или Autodesk 3ds Max, то вы нуждаетесь в качественных текстурах и материалах. Скачать бесплатно бесшовные PBR-текстуры в различных популярных форматах для игровых движков Unity, Godot, Cry Engine 5 или Unreal Engine 4/5 вы можете через базу https://pbr-textures.com, где представлены разномастные PBR-материалы для разработки игр, архитектурного проектирования, 2D-дизайна и создания 3D-сцен, а также наборы бесшовных текстур высокого разрешения.


 Меню геймера